
How to Fix a Dent in a Car: Basic Dent Removal and Refinishing
This article deals with the most basic metal dent repair and refinishing - no pulling or clamping - just basic sheet metal body repair and body filler work. This is the most common auto body repair work for both the professional as well as the do-it-yourselfer. Most all repairs will involve these basic steps:
- Rough Out
- Grind and Fill
- Shape and Sand
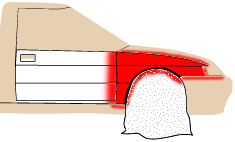
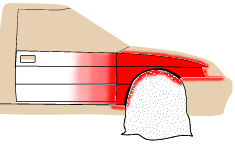
In this sample repair of a mini-truck right fender let's go through the steps one by one.
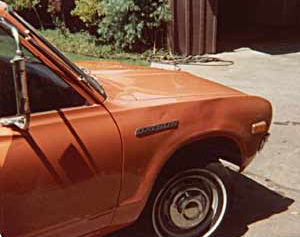
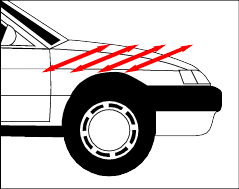
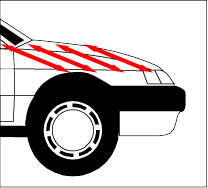
Rough Out: How to Beat Out a Dent
First step is to rough out the damage. Use a hammer and dolly to beat out the dents. Grasp the dolly and reach behind the fender and strike light blows to work out the damage. Work from the outside of the dent gradually towards the center where the dent is the deepest. Don't strike heavy blows in the center of the dent first because this can stretch the sheet metal. This will result in high spots when applying the filler and you wind up beating down the high spots when sanding the filler. Once the outer areas of the dents have been worked out a bit, then go for the insides.
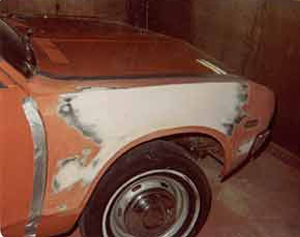
Grind and Fill: How to Use Body Filler to Repair Dents
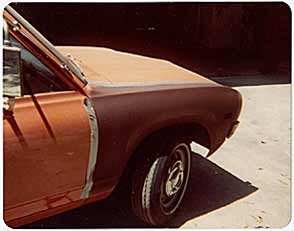
The next step is to grind away all the paint in and around the damaged area in order to apply body filler. Use a 5" dia high speed sander with a 24 grit abrasive disc and backing pad. Notice the duct tape on the front edge of the right door. This is to protect the paint from secondary damage from the grinder or sander. Apply several layers of duct tape for adequate protection.
How to Apply Body Filler
Here's a useful auto body filler tip; when applying body filler spread it slightly beyond the original damaged area. This is for feather-edging. When sanding body filler down, you will feather-edge it into the bare metal so there will be a perfect transition between bare metal and the filled area.
Mix the body filler thoroughly using a spreader and mixing board. Use enough hardener to achieve a ligh pinkish color. If you use too much hardener, the mix will "kick" too fast and you won't have enough time to work it. Spread it in smooth, even strokes, shaping as you go.

Tip:
After grinding and before applying the body filler, use a 6" DAQ sander with 220 grit Stikit™ paper and feather-edge all the surrounding paint edges. This will make it easier to prep the panel for refinishing by avoiding accidentally gouging the body filler and spoiling any straightening work. Paint is generally harder and more dense than body filler and takes more sanding to feather-edge. By doing this step before applying the body filler, you will achieve a perfect transition between the painted and filled areas when you sand the body filler.
Shape and Sand: How to Use Body Filler Shaping Tools
After applying the body filler, let it set until it is the consistency of soft cheese. Do not wait until it is fully hardened! At this consistency it is easily shaped and sanded using several important body filler shaping tools. Use a 10" half round body file (or cheese grater) and gradually shave the excess filler, shaping the panel as you go. Do not remove too much filler or else there won't be enough for a level surface. You're still going to be sanding with 40 grit and 80 grit paper which will remove even more filler. Getting this right takes a little practice.
All the shaping is done with the cheese grater. The sandpaper is mainly to smooth out the cheese grater marks.
Use sanding strokes like the diagram below for all sanding and cheese grating operations.
Forward sanding motion...
Keep the sanding block parallel to the
crown of the sheet metal
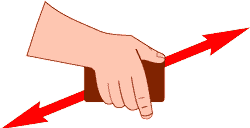
Correct
Reverse the sanding direction as well. These motions will give you a straight panel.
Reverse sanding motion...
If the sanding block is not parallel to the
crown of the sheet metal, the panel will
not come out straight.
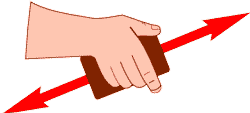
Incorrect
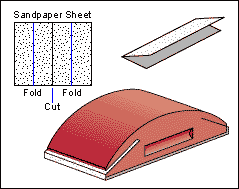
Next, while the filler is still setting, obtain a sanding block and two different grits of sandpaper. Don't buy garnet paper from a local hardware store. Garnet paper is for wood. Obtain the real thing from a professional refinish supply house. The type of sandpaper used in auto body repair is called "free cut" paper. Buy both 40 grit and 80 grit paper. Setup the sanding block by tearing a sheet of 40 grit sandpaper in half. Fold one of the half sheets in half once again and wrap this around the sanding block. Use the 40 grit on the soft body filler and gently smooth out the cheese grater marks. Don't over sand because you will need to feather-edge the filler into the bare metal.
Tip:
This step can be done faster when the sanding block is used in combination with with an air file. There are two styles of air file pads available - one for PSA (pressure sensitive adhesive) sandpaper and one for sandpaper with a plain back. Obtain the appropriate sandpaper for the pad you are using.
Tip:
You can extend the life of the sandpaper and remove clogs by taking an ordinary coat hanger and stretching it out. This makes a long, slender loop of coat hanger wire. You slap the sanding block with the coat hanger and this will unclog the paper.
Final Sanding With 80 Grit Sandpaper
Now let the filler set until it is fully hardened. The panel should be straight and smooth. When the filler is fully hardened prepare the sanding block (or air file) with a sheet of 80 grit paper. Use this grit to smooth out all the remaining sandpaper marks from the 40 grit paper. At this point, all the marks left from the 80 grit paper can be filled with primer-surfacer.
If necessary, repeat these "Shape and Sand" steps and reapply more body filler to fill in low spots. Repeat as often as necessary to obtain a straight panel.
Primer-Surfacer Applied To Fender
Once the panel has been straightened, it is now ready for refinishing. Refinishing involves two basic steps: paint prep and final finish. In this sample repair of a mini-truck right fender start by applying primer-surfacer.
Paint Prep:
At this stage of the repair apply medium coats of primer-surfacer to fill the sand scratches left by the 80 grit paper. Don't apply the coats too heavily because that will trap the solvents and prolong drying time.
Apply primer only to sanded areas of the panel where either the paint was feather-edged or where there is body filler. Do not spray primer-surfacer on unsanded paint. It will not adhere properly.

Tip:
Don't buy spray cans of primer from your local hardware store because plain primer does not contain the heavy solids needed to fill the sand scratches. Obtain the real thing from a professional refinish supply house.
Applying Primer-Surfacer
Use either a siphon feed gun or a gravity feed gun. Use a tip size between 2.0 and 2.4 mm because primer-surfacer contains heavy solids and requires a larger nozzle orifice than the topcoat. Keep applying coats of primer-surfacer until there is enough buildup to sand smooth. Click here for explanation of gravity feed and siphon feed spray guns.

Warning! - Be sure to wear proper protection for breathing and handling paint and related chemicals. Use a supplied air respirator and wear disposable gloves. Consult the manufacturer's recommendations regarding the safe handling of these and other related materials.
Sanding With a Dual Action Sander
Allow the primer-surfacer to dry thoroughly. Using a 6 In DAQ with 220 grit Stikit™ paper, sand the primer smooth, removing all the 80 grit scratches. The great thing about using a DA with 220 grit paper is that this is the fastest way to prepare the panel for finishing.
Tip:
Some people prefer 180 grit paper to make the job go faster, but 220 grit will give you a smoother surface and less chance of sand scratches showing through the finish.
Reapply Primer-Surfacer:
Normally, you would have sanded completely through the primer into the bare metal areas or into the body filler. At this point reapply more coats of primer-surfacer. Remember to apply primer only to sanded areas of the panel and not to areas of un-sanded paint.
Repeat the process of applying primer-surfacer and sanding with the DA until you have:
- A perfectly smooth surface, and...
- No areas of bare metal or body filler showing through, and...
- No primer-surfacer on un-sanded paint.
Fill Pinholes With Spot Putty
At this point it is normal that you will discover pinholes in the primer. This is caused by bubbles in the body filler when mixing the catalyst (hardener) into the body filler.
The way to correct this is with spot putty. Using a rubber squeegee, apply a thin coat of spot putty in each pinhole.
Wait for the spot putty to dry thoroughly, then use either the DA with 220 grit sandpaper or wet-sand the areas with a sanding block using 600 grit wet-or-dry sandpaper and lots of water.
You can apply the topcoat directly over the spot putty.
Tip:
Using 220 grit with a DA is different from wet-sanding with 220 grit paper. The DA disperses the sanding motion and doesn't leave scratches. Wet sanding tends to leave scratches even when using 600 grit paper unless you sand very lightly with lots of water.
Finish Coat Applied
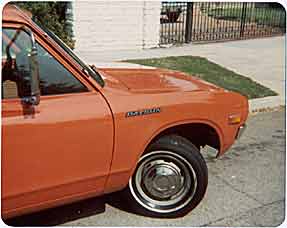 Wrapping up our approach to basic automotive dent removal and refinishing, we will apply the final finish. Once the panel has been paint prepped, it is now ready for the color coats. In this sample repair of a mini-truck right fender start by obtaining all the necessary materials...the paint and related reducers, hardeners and blending solvents.
Applying The Finish Coat
The panel is now fully prepped and is ready for the final finish. Browse our automotive paints and obtain enough paint for the job. For this job we used a quart of paint. You can either color match it yourself with a tinting kit or you can have a refinish supplier match it for you. Give him a car part like the gas cap cover or a damaged panel that was replaced in the repair. In this case the color is a pastel (solid color...not a translucent or metallic color) and the paint used is acrylic enamel. When using acrylic enamel, obtain the proper hardener and reducer for the job. Hardener usually comes in pints and reducer is available in one gallon cans.
Tip:
Make sure all the paint and related reducers, hardeners and blending solvents are compatible. Stick with the same brand name for the paint, hardener and reducer and, if possible, the blending reducer. Never mix lacquer with acrylic enamel. Check with your refinish supplier first.
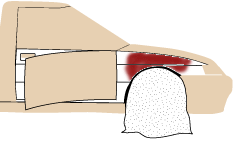
Prepare The Adjacent Panel For Blending
When doing spot repairs such as this one (a spot repair is anything from a small spot to an entire panel...as opposed to a complete paint job), you can either blend the new finish into the existing finish or you can end the refinish at a line of definition such as the door gap. In this case we decided to do a blend.
To prepare for the blend you must thoroughly remove all the contaminants from the panel to be blended and use rubbing compound to remove all the surface oxidation. In addition, obtain a gallon of blending reducer from your local refinish supplier. Blending thinner is a mixture of slow reducers and clears so the thin blend coat flattens out and dries with a gloss.
Start by washing the door with a silicone remover such as Prep-Sol™. Silicone is present in tire treatment products such as Armor-All™ and is an adhesion-killer.
Next, use a high grade rubbing compound such as 3M 5955 and thoroughly rub out the entire door panel until all surface oxidation is removed.
Tip:
Don't buy cheapo rubbing compound for this job. Get the real thing at your local refinish supply house. Most professional body shops use 3M 5955. It comes in a plastic gallon container. It cuts very fast and leaves the panel perfectly prepared.
Mask The Surrounding Panels
Mask the surrounding panels with masking paper or plastic sheet. Make sure you cover all openings where overspray can creep in.
Temporarily cover the door with masking tape and paper. This will be peeled off just before the last top coat so you can apply a small, thin band of wet paint to the door for blending.
Use wheel maskers to cover the wheels. This is the fastest, most convenient way to mask wheels.
Tip:
Don't buy cheapo masking tape for this job. Get the real thing at your local refinish supply house. Use a high grade masking tape such as 3M 6334. It lays down around curves without bunching up or tearing, and it comes off easily without fighting and scraping off tape and adhesive.
Blow and Tack The Panel
Using a blow gun, thoroughly blow off the entire panel. The air pressure from the spray gun will kick up dirt from the darndest places, so it is better to get it out now. After blowing off the panel, use a tack rag and lightly tack off any remaining dust particles. The panel is now ready for refinishing.
Apply The Paint
Using either a siphon feed gun or a gravity feed gun with a tip size between 1.2 and 1.4 mm, apply a very light dust coat over the primary area that was repaired. Allow this coat to flash-dry so it is tacky. This will provide a base for the heavier wet-coats to stick to. If you were to start in with a wet coat, the paint would run for sure.
When this coat is tacky, apply the first wet coat. This next coat will usually be the heaviest, and you should obtain full color hiding at his point. Lay down the paint in a vertical, overlapping pattern and push the wet edge from one end of the panel to the other. Work from the front of the panel backwards to the door edge and from the top down.
Warning! - Be sure to wear proper protection for breathing and handling paint and related chemicals. Use a supplied air respirator and wear disposable gloves. Consult the manufacturer's recommendations regarding the safe handling of these and other related materials.
Blending The Door
When applying the color coats, leave the surface slightly "orange-peely". Acrylic enamel takes a few minutes to fully flow out and lay flat. If you are too aggressive you will get runs in the paint. This takes practice - lots of it!
Allow enough flash time between the second and third coats of color. The third and last coat will be a very light wet coat. The paint is already wet and less is needed on this last coat. Immediately after applying this last coat of paint, carefully peel away the masking tape and paper on the front door edge. Be very careful not to touch the wet paint on the fender. Spray a continuation of the last coat into the front edge of the door. This band should be about 3" to 4" wide.
Now pour out one half to three quarters of the remaining paint in the spray cup. Add blending reducer to the remaining paint until you have about a 50-50 mix of blender and mixed paint.
Spray this mix over the front edge of the door and extend this band into the remainder of the door an additional 6" to 8" beyond the first blend coat applied previously.
Basic DIY auto body repair can be done at home for a fraction of the cost of taking your vehicle to a body shop. We hope this guide helps you along the way. Have questions or need parts? Contact us so we can help.
Don't want to paint? Check out our paintless dent repair tools.
