How to Remove a Windshield & Quarter Glass (Glass Repair/Installation)
Sometimes it is best to R & R (remove and replace) glass for a repair. This article will demonstrate how to remove a windshield, quarter glass and instructions for other automative glass, whether you need to repair or replace it. One of the limitations of refinishing around glass openings is achieving a good masking of the weatherstripping without the tell-tale line of paint where the masking tape covers the weatherstrip. When doing a total restoration of an older car (such as a Ford Mustang), the only way to achieve a perfect paint job around the glass openings is to remove the glass.
Glass Definitions
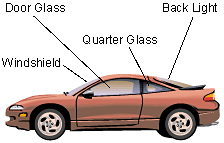
First, let's clear up the words. The front glass is called the "windshield" here in the USA (the British call it the "windscreen"). The rear glass is not called the "rear windshield". It is called the "back light".
Then there is the "door glass" for windows that retract into the doors. Lastly, there is the "quarter glass" as found on 2-door coupes. Quarter glasses can either retract like door glass or open outwards at the rear by means of front hinges. They can also be stationary (like in a Volkswagen Beetle).
Two Ways To Mount Automotive Glass
Other than mounting quarter glass with screws (such as in the Honda Civics and Accords), there are two ways glass is usually mounted in the vehicle.
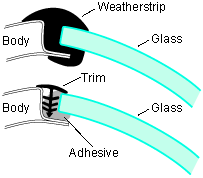
Windshields, back lights and quarter glasses are mounted to the body shell to a mating flange where the inner and outer body panels are welded together.
One way the glass is mounted is with rubber weatherstripping to hold the glass in place.
Weatherstripping sometimes comes with strips of metal trim which is inserted after the glass and weatherstrip is installed. Sometimes these trim pieces actually wedge the glass and weatherstrip to help hold them into place.
The other way is where a water-tight adhesive is used to glue the glass in place. This adhesive takes the place of overlap both the body panels and the glass. In this case the glass contributes to the overall structural integrity of the car. In most modern unibody cars this is the usual method of mounting glass.
There are a number of different brand options for tools depending on the type of installation or repair you are going to undertake, but a couple standouts are Equalizer and Glass Technology.
Windshield Knives
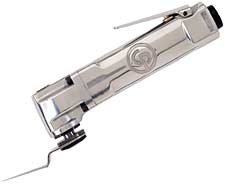
To remove glass that is held by adhesive, you need a windshield knife. Pneumatic versions of these windshield cutters are available, along with assortments of blades.
In reality, there is little chance of removing glass that is held with adhesive without breaking it. Usually you remove glass that is already broken, such as in collision repair.
The knife is worked into place under the glass and it is drawn towards you, steadily rocking back and forth while pulling on the knife.
Windshield Wire Kits
Another alternative to the knife is the use of windshield wire along with a pair of grips. Some handy windshield tools include the windshield chisel and windshield scraper (below).
Replacing Automotive Glass Using Adhesive
Once the body panels have been refinished, replacing glass held in place with adhesive is a straightforward process. First, fit the glass to the opening to make sure there is a perfect fit. If necessary, continue with sheet metal straightening before refinishing the panels until the glass fits perfectly. Obtain a caulking gun and a tube of windshield adhesive (such as one manufactured by 3M) obtainable at your local refinish supply house.
Make sure that both the glass and the body panels have been thoroughly cleaned to remove all contaminants and old adhesive so a perfect water-tight seal is attained. Apply the adhesive to the mating flange on the body panel evenly so there is an unbroken bead all the way around the glass opening.
Carefully place the glass onto the opening and press it down so the bead of adhesive spreads slightly. Make sure to allow room for the trim pieces. There are spacers designed for this purpose which can be obtained. Let the adhesive set for the recommended time. Then reinstall the trim pieces.
Remove Quarter Glass
Removing and replacing glass held in place by weatherstripping is a little more straightforward but there are a handful of glass removal tools that could prove helpful. Let's use an example of a quarter glass first. Quarter glass can easily be removed by one person without breaking.
From the inside of the car and using the thumbs and forefingers, start by gently working out the lip of the weatherstrip on a corner of the quarter glass. Proceed from this corner around the quarter glass gradually working out the lip while gently pushing the quarter glass outward. Work all the way around the quarter glass in this manner to first loosen the lip of the weatherstripping.

Pro Tip:
Obtain a spray can of silicone glass lubricant and thoroughly wet the surrounding edges of the weatherstrip all the way around the edges of the glass. This will help dislodge the weatherstrip from its seat and make it easier to remove the glass.
Finish Removing Quarter Glass
Select a rounded corner of the quarter glass as a candidate for pushing the glass and weatherstrip out and push out this corner to dislodge the weatherstrip from the sheet metal mating flange.
If the glass doesn't dislodge without flexing, you have to work the lip out more before pushing. Don't force it or you will break the glass.
Once you have worked a corner completely out, it is easy to finish the job. Gradually pull the lip of the weatherstrip away from the mating flange from both directions of the pushed-out corner. The glass will come completely out with the weatherstrip attached to it.
Remove Windshield
Removing the windshield is a little trickier than quarter glass, though we do have a handful of windshield repair kits that can make it easier. First, it's bigger and it is usually curved. Second, sometimes this requires an assistant to help. Start by removing any trim pieces on the weatherstrip that may be wedging the weatherstrip in place. Also remove any interior trim from around the glass. Start by loosening the lip of the weatherstripping all the way around from the inside of the car as with the quarter glass.
You will be using your feet to dislodge the glass. Adjust the front seats and assume the position shown in the diagram. You will be pushing both top corners at the same time. If you have used enough silicone lubricant and loosened the weatherstrip enough, the top two corners will pop out.

Caution:
There is no guarantee here. It is easy to break the glass. Only attempt this if you are willing to replace the glass.
Tip:
Again, use silicone glass lubricant and thoroughly wet the edges of the trim pieces on the weatherstrip so they are easily removed. If this is an old car with worn weatherstripping, take care not to tear it.
Reinstalling the Windshield
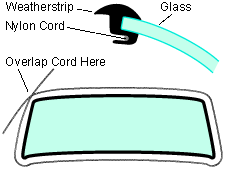
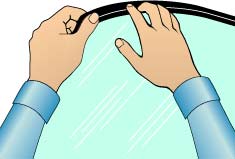
The technique for reinstalling quarter glass or windshield or back light for glass held in place by weatherstripping is all the same. Obtain a piece of 5/16 to 3/8 inch dia. nylon cord. Make sure it is long enough to wrap completely around the weatherstrip and overlap across the corner of the glass (see diagram). First attach the weatherstrip to the glass making sure that the outside of the weatherstripping faces the outside of the glass.
The weatherstrip has two grooves, one for the glass and one for the mating flange on the body shell. Insert the nylon cord into the groove for the sheet metal flange. Push it all the way down inside the groove and pull it tightly around the weatherstrip and overlap it at one of the corners of the glass as shown in the diagram.
Press Glass Into Opening and Pull Cord
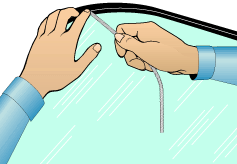
Spray silicone lubricant into this groove so the cord and the weatherstrip is thoroughly soaked on the inside as well as the side that faces the glass opening. You can't use too much lubricant for this step.
Press the glass into the opening from the outside of the car. Use even pressure to hold it up against all of the opening. You may need more hands to do this so use an assistant if you have to. While pressure is being applied from the outside of the car holding the glass into its opening, start pulling one end of the nylon cord towards you while you are inside the car. Be careful not to tear the lip of the weatherstrip while doing this. Starting at a corner of the glass, gently pull the nylon cord, working it in a circular motion to gradually coax the lip of the weatherstrip into into its seat on the mating flange.
Work in one direction only, seating the weatherstrip as you pull out the nylon cord. You will pull the cord out all the way around until you hit the overlap area. The overlap is there in case the weatherstrip unseats as you go around.
This completes the installation! Have questions or need parts? Contact us so we can help.